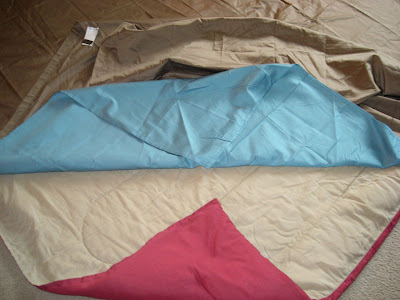
While Sean helped the girls change their room from spring green to creme, I set my sights on changing our well loved comforters into beautiful new bedspreads. (Note: Though my mom and sister sew wonderfully, I never took the time to learn. I just recently learned how to thread a machine.)
I did some research online and kind of combined some of the methods I read. We used Hannah's small sewing machine which did the job.
First, we selected two sheets for each comforter. The blue sheets were purchased for $2 each off the Walmart Clearance shelf. The larger brown sheet cost $10 at Marshall's. Next, we measured the sheets and cut them down as needed so that they were 1 inch larger than the comforters to allow for 1/2 inch seam allowance. We pinned the sheets together with the right sides facing in and sewed the bottom and sides together.
With the sheets now sewn we added ties to the corners and sides of both the cover and the comforters. Tying the two together keeps the comforter from shifting around. Then we turned it all right side out and there you have it!! I love it that they won't need a flat sheet for their beds and that these will be easy to wash.
I'm still contemplating how to close up the top. I tried to hot glue Velcro tabs, but that didn't work. Button holes would be nice, but I don't know how to do that. I'm thinking that I'll sew on snaps. Hopefully this will get done before 2010.


I'm thinking that with making my own duvet covers we may never have to buy bedding again. This so works for me. There are other great ideas over at Rocks in my Dryer so check it out!
See part one of the makeover here.


14 comments:
I bought a duvet cover that has button holes at the top but it still leaves big gaps at the top. I ended up putting the top at the foot of the bed and now it is not a concern. Maybe this would work for you. Just a thought.
Thanks for sharing this with us. I am due to redo my daughters' rooms this month and think I will make duvet covers for them now.
What a great job you are doing! How exciting for the girls! I'm so happy for you all.
It looks beautiful!! I can't wait to come over and see it. If you want... I could probably do some button holes or snaps for you this week. Let me know :)
While I love the bedroom - of course - you all rock...my favorite shot is the cozy dinner :) That is just so real life, ain't it?
My sewing machine does button holes. Check your manual. Yours might as well! If not, you could sew the ties on at the top as well. Or sewing velcro dots might work.
Hey Monica,
I stumbled across your blog as I have been keeping up with Michelle. How neat to see your lovely family! It makes me feel so old! Your daughters look so much the way I remember you and your younger sisters looking. If you get a breather, contact me through my family's website:
ok4life.com
I would love to hear how your parents are and what Lucinda is up to these days. You have a very sweet blog!
Dawn Davis (Watkins)
I saw your family come in to the Spaghetti Factory night, but didn't want to bother you while eating. Were you able to enjoy your meal? Our waiter said that those prices will continue every Monday and Tuesday night in January.
What a great frugal idea. It sure makes redecorating easier. Thanks for the tip.
How crafty you are! You might try velcro if you don't want to do buttons? Also, you were asking about the slicer I use and the size. Not too bad, really---we didn't get one of the giant guys...here's a link to what we use.
http://kitchen-dining.hsn.com/chefs-choice-premium-electric-food-slicer-with-2-blades_pf-211645_xp.aspx?club_id=211645&sz=5&sf=QC0019&rdr=1&cm_mmc=Shopping%20Engine-_-NexTag-_-Kitchen%20And%20Dining-_-Chef's%20Choice;%20Premium%20Electric%20Food%20Slicer%20with%202%20Blades%203163436
And I LOOOOVE the picture of you and the family all doing the casual dinner! Too sweet! Your kids will definitely remember those moments!
My the closures for my duvet is at the bottom of the bed. - I've had velcro closures, buttons & snaps. They all are about the same when it comes to getting the flap closed.
You did a great job, by the way - and thanks for the tutorial!
I love dish towels and dish cloths - but then again, I love to wash dishes. It is my relaxing time. I've been thinking about a better way to store the towels inbetween wash loads - and that little wire bucket is a great idea!
Come visit me today at The Goat
Kristin
not sure how the dishtowel comment got in there! ooops.
Kristin
Hi there, I LOVE bedding, but am working to be a more frugal mommma and LOVE your idea! I do have a question, though. What do you mean by "sew ties to the top of the comforter and the cover?"
I understand that by tying them together then the comforter won't slide around (brilliant, as that drives me NUTS!) but not sure exactly how you go about doing that? Also, how tough was the sewing for a non-sewer? Thanks!
carrie.hardin@leesummit.k12.mo.us
That is such a good idea!! I might have to use it in our household :)
Here's an idea to close that duvet. Sew 4 or 5'' strips of cloth on both sides of the duvet at equal intervals along the open edge of the cover. Then just tie them into loose knots. Then when you need to clean them, it's as simple as untying the knots and slipping the old comforter out, and it's easy to sew them on...
Or maybe think about a zipper.
Post a Comment